
The #4 panels were taped onto the temporary frames today, and I spent some time starting to get the panels all aligned.
Remember... if you are following the Pygmy manual, you will not be doing this. Instead you will be building your kayak right-side-up and sewing it together with dozens of wires through dozens of holes that you drill through your panels. That is the old "stitch and glue" method.
Instead, I am using strapping tape and Gorilla Tape to hold the panels onto the frames. Also remember that to build your boat this way that you need to have accurately cut "spacers" that you carefully mount onto your temporary frames. See my earlier posts. This hull will NOT have hundreds of holes! It's a muuuuuch cleaner look. It's also, in my opinion, much easier. I'm truly stumped as to why Pygmy hasn't switched over to this method years ago.
ATTENTION: The taping method is NOT in the Pygmy manuals! IF you do the taping method you are on your own. However, Pygmy has ever-so-slowly started to come around to the method themselves and it is generally how they build the boats in their hand-on classes (although they still wire the stem and stern).
Here's how it looks this evening:

For the most part I use strapping tape. It's hard to tell in these photos, but in some areas I wrap the tape all the way around either the hull or the hull & table.
I'm also not in a hurry. I started the taping yesterday, got 90% finished today, but probably won't get to epoxying the seams until this weekend (today is Thursday). Yes, a few pins might pop out by then, but most of the tape and pins will stay in place. It's more important that you get it ALL lined up just right and check that the hull isn't warped or twisted. So I'll return to it tomorrow or this weekend and tweak it to my heart's content and only then will I epoxy the seams.
In the photo below you can get another look. If you look closely you might see that the seam between the #3 and #4 panels in the middle isn't meeting up too well. I'll do my best to get it to line up better but right now I can't get it to budge. In the end it's not that big of a deal and you won't notice it too much, especially after it's filled with thickened epoxy. But I'll try to improve it anyway...

Below... Here's a shot of the stern. It's obviously not ready for epoxy yet and I'll do more work to get it to close up and be straight. The gap between the panels in the stern is common and I don't have an explanation for why they don't meet up well. I'll tape the hell out of it and they'll come closer together but probably won't entirely meet flush. But again, thickened epoxy makes it not so noticeable.
Those small clamps are working out very well so far! I got them at Home Depot. They're $.49 each. The ends are coated in a rubber dip but you can easily rip it off. The bare metal grips the wood better. They might leave an impression but shouldn't be too much.

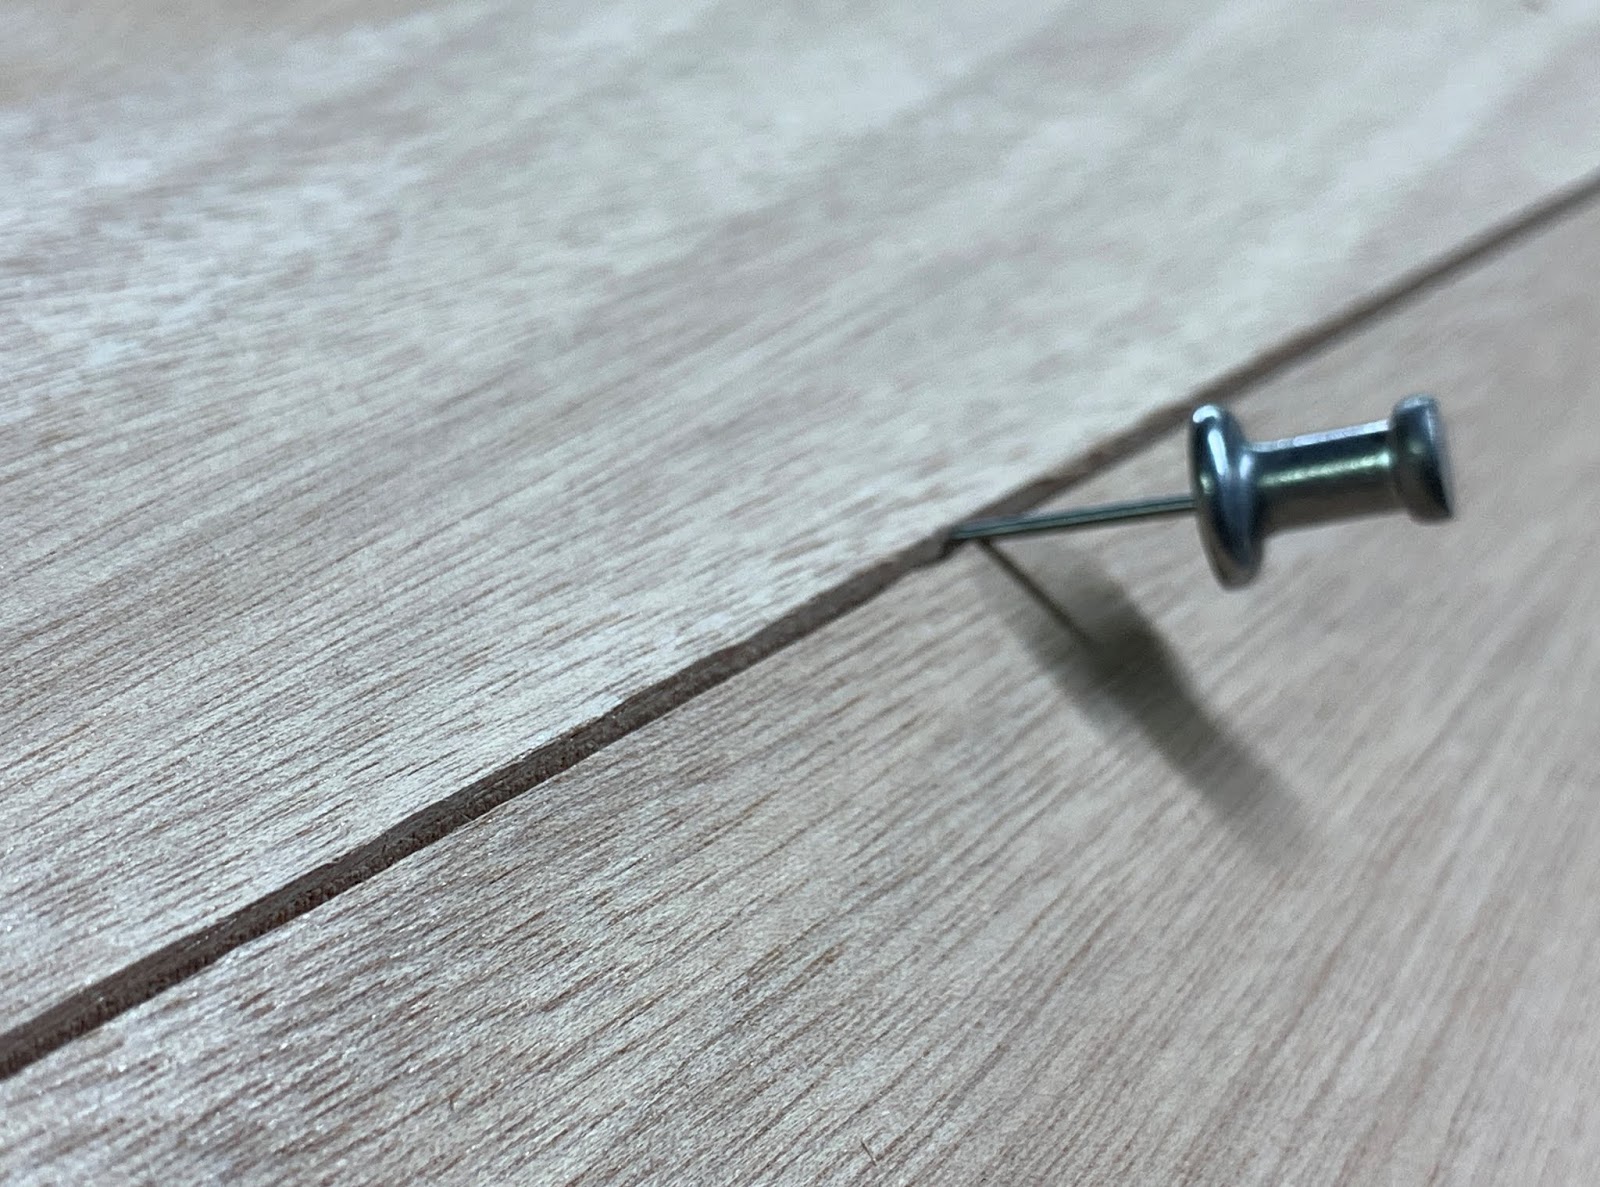
"What's with the push pins?" you might ask! Good question. The push pins are VERY useful. You use them to hold one panel even with the one next to it.
It's hard to tell in the pictures... they look like they're just stuck in the seam. But what they are really doing is holding one panel out and the other panel in. When you get to this stage you'll quickly see the usefulness of them. Use them wherever you need. By the way... epoxy doesn't stick to them so they pull out easily.
The only problem is that Pygmy supplies just a few of them, but you really need dozens! I buy an extra 30 of them, and add them to the other 20 or so I already have from previous builds. BUY EXTRA PINS... AT LEAST 20 EXTRA. They're cheap and their usefulness far exceeds the $.15 they cost each.


Here is my first look from outside the garage at the bow. Right now it looks pretty straight but I'll really give it a good look before I epoxy.

More when I epoxy the seams!
Cheers!
Remember... if you are following the Pygmy manual, you will not be doing this. Instead you will be building your kayak right-side-up and sewing it together with dozens of wires through dozens of holes that you drill through your panels. That is the old "stitch and glue" method.
Instead, I am using strapping tape and Gorilla Tape to hold the panels onto the frames. Also remember that to build your boat this way that you need to have accurately cut "spacers" that you carefully mount onto your temporary frames. See my earlier posts. This hull will NOT have hundreds of holes! It's a muuuuuch cleaner look. It's also, in my opinion, much easier. I'm truly stumped as to why Pygmy hasn't switched over to this method years ago.
ATTENTION: The taping method is NOT in the Pygmy manuals! IF you do the taping method you are on your own. However, Pygmy has ever-so-slowly started to come around to the method themselves and it is generally how they build the boats in their hand-on classes (although they still wire the stem and stern).
Here's how it looks this evening:

For the most part I use strapping tape. It's hard to tell in these photos, but in some areas I wrap the tape all the way around either the hull or the hull & table.
I'm also not in a hurry. I started the taping yesterday, got 90% finished today, but probably won't get to epoxying the seams until this weekend (today is Thursday). Yes, a few pins might pop out by then, but most of the tape and pins will stay in place. It's more important that you get it ALL lined up just right and check that the hull isn't warped or twisted. So I'll return to it tomorrow or this weekend and tweak it to my heart's content and only then will I epoxy the seams.
In the photo below you can get another look. If you look closely you might see that the seam between the #3 and #4 panels in the middle isn't meeting up too well. I'll do my best to get it to line up better but right now I can't get it to budge. In the end it's not that big of a deal and you won't notice it too much, especially after it's filled with thickened epoxy. But I'll try to improve it anyway...

Below... Here's a shot of the stern. It's obviously not ready for epoxy yet and I'll do more work to get it to close up and be straight. The gap between the panels in the stern is common and I don't have an explanation for why they don't meet up well. I'll tape the hell out of it and they'll come closer together but probably won't entirely meet flush. But again, thickened epoxy makes it not so noticeable.
Those small clamps are working out very well so far! I got them at Home Depot. They're $.49 each. The ends are coated in a rubber dip but you can easily rip it off. The bare metal grips the wood better. They might leave an impression but shouldn't be too much.

"What's with the push pins?" you might ask! Good question. The push pins are VERY useful. You use them to hold one panel even with the one next to it.
It's hard to tell in the pictures... they look like they're just stuck in the seam. But what they are really doing is holding one panel out and the other panel in. When you get to this stage you'll quickly see the usefulness of them. Use them wherever you need. By the way... epoxy doesn't stick to them so they pull out easily.
The only problem is that Pygmy supplies just a few of them, but you really need dozens! I buy an extra 30 of them, and add them to the other 20 or so I already have from previous builds. BUY EXTRA PINS... AT LEAST 20 EXTRA. They're cheap and their usefulness far exceeds the $.15 they cost each.

Here is my first look from outside the garage at the bow. Right now it looks pretty straight but I'll really give it a good look before I epoxy.

More when I epoxy the seams!
Cheers!
Comments
Post a Comment