
Taping instead of stitching & wiring a Pygmy Borealis XL kayak: Part 2
THIS ENTIRE POST IS AN ALTERNATIVE STEP FROM THE OFFICIAL PYGMY MANUAL: Once you have your temporary frames set up then it's time to start laying out the panels.
Other than being upside down, taping the hull isn't that much different at this point than wiring.
Have several rolls of strapping tape; the type with the monofilament running through it. I only used one full roll but will probably use at least another full roll when I tape the deck together later.
Cut several strips of tape. As you cut each strip, fold the both ends over oh itself by 1/4" or so. This creates a tab to make it MUCH easier to pull the tape off later. Really, do this to both ends of every single piece of tape that you use! You will thank me later.
Stick them onto your table for easy reach. The picture only shows four but have many more ready to go.

Note: I was completely forgetful and didn't get a single picture of my actual taped up hull! Ugh! Stooopid, stooooooopid... HOWEVER, you can see my post for taping the deck panels to get an idea of what the hull looked like. Oh well.
Here are the steps to tape your Pygmy kayak together:
1. Set the #1 panels on the frames: Start with just your two #1 panels. Lay them out on top of your temporary frames with the sticker side down. Make sure that the left panel is on the LEFT side of the hull keeping in mind that the hull is upside down.
HINT: When the hull is upside down, standing to the side of the temporary frames - If the bow is to your left, you're on the right side. This is the side you will put your "R" or right-side panels onto. If the bow is to your right, you're on the left side.
Also make sure the bow ends are pointed forward and the stern ends are pointed aft! You'll know if your #1 panels are laying correctly if the bow ends curve away from each other. Remember that as you start to twist the panels into a hull shape that the bow ends will start to come together and curve up (down actually while the hull is upside down).
Look underneath the panels to make sure that the lines you drew on the panels line up with the appropriate temporary frames. You're only lining up the three main temporary frames at this time. The smaller bow and stern end frames will be added later.
2. Align the #1 panels and tape them: (It's much easier if you have a helper during these steps) Now spend some time carefully aligning the two #1 panels so that the main seams line up perfectly. There should be a crisp line running across both panels. When lined up, place half of a strip of tape onto the epoxied portion of one of the panels but don't cover the main seam (you want to always see the seams to make sure that they line up properly). Just put it next to the seam on the epoxied bit. Now evenly and carefully lift the outside edges of both panels just an inch or so to bring the keel seam together a bit. Firmly stretch the tape across the keel seam and firmly press it down onto the other panel. If you have a helper then place a second piece of tape across the keel seam about 6-8" aft of the first piece. When you then let the outside edges back down the tape will firmly bind the keel seam together.
3. Tape the rest of the #1 panels out to the frames: Now work your way down the hull, alternating forward and aft, and tape the keel seam every foot or so. You might lift the outside edges again at least for the widest parts. Keep checking to make sure that the inside of the keel seam is sitting directly on top of the temporary frames at the highest points on the frames. Also make sure that the lines you drew on the panels line up with the frames.
Sight down the keel after every piece of tape to make sure the keel seam is straight.
NOTE: As you are taping, try not to have the tape hang over the outside edges of the panels. They just get in the way of the next panel.
4. Hot glue the panels to the frames: Once you have taped across the seams forward and aft far enough to get to the frames, you will then hot glue the panels to the frames. Take a hot glue gun, and while holding each panel down onto the frame, run a bead of glue about an 1" long on each side of the outside edge of the frame and the panel. This will hold the panels down and in place. Later on once the hull is turned over you can knock them out fairly easily.

5. Tape the ends: When you get toward the ends you will need to be creative with your taping. I just tape the keel seam as best I can for now knowing that I'll have to add more tape after I hot glue the bow and stern end frames.
As you work toward the bow and stern make sure that the panels don't slip and overlap each other. The panels should meet evenly at the edges. Yes, you can get them to do this. It's not that hard, but you'll need to keep your eye on the keel seam and check if it remains straight. If not use some of the long thumb tacks included in the kit to keep the keel straight. Just push them in one edge and lever it to straighten the two seams. You can also use the edge of a utility knife. Then add more tape across the seam to keep them aligned. NEVER tun tape ALONG the seams, always across so that you can have access to the seam later to put epoxy into the seam.
6. Hot glue the bow and stern END frames: Your kit includes two small pointy temporary frames. One should be marked bow and the other stern. You should also have already drawn lines on your panels for where these go. Line up the bow end frame underneath the bow and hold the outside edges down. If you have a helper you might be able to just hold the edges down while the other person runs a 1" bead of hot glue on both sides of the bow end frame for both panels. Hold it down until the glue cools which may be a few minutes. While you're doing this keep checking to see that the keel seam is still tightly butted together and that the end frame is pushed all the way up into the inside of the keel seam.
Repeat this step for the stern end frame.
7. Tape the bow and stern ends: You can try to bring the bow ends together with clamps but they usually slip off unless you make wedges. You can also try running tape underneath the panels to hold the outside edges down but that means that you'll have to cut some tape out later on. I run tape underneath (that is, down under the panels and all the way across the inside of the hull to the other side) wherever I need to. It can be a bit of a challenge getting them out later after you've epoxied the seams, but it's not that bad.
8. Double and triple check the keel seam: Now is a great time to make any adjustments needed. Are the main seams still lined up? Are the aft seams lined up? Is the keel seam straight? Spend some time on this step because once you start adding the next panels it becomes almost impossible to make changes. Small imperfections now will be magnified later on so be sure the keel is a straight as you can make it.
9. Tape on the #2 panels: Carefully place one of the #2 panels onto the hull in the proper orientation (see step 1 again). Line the main seams up perfectly with the #1 main seams. Once aligned then firmly stretch tape across the #2 panel onto the #1 panel. Again, it helps to lift the outside edges a bit to make the taping even tighter. Now put the other #2 panel on and tape it the same way.
Repeat the same basic processes (Steps 2-8 above) for both #2 panels. You will always do BOTH sides at the same time. Do NOT do all the panels on one side and then the panels on the other. This will make for a crooked hull. By doing both sides at the same time you can make a much straighter hull.
10. Tape on the #3 and #4 panels: Repeat for the #3 panels and then again for the #4 panels.
The hull should now have many, many strips of tape on it! That's OK as long as you can still see most of the seams so that you can add epoxy.
11. Straighten the keel seam at the bow and stern: Sight down the keel seam paying attention to the bow and stern. Are they straight? Do whatever you need to do to straighten the bow and stern seams so that the entire keel seam is as straight as possible. Use tape, clamps, pressure, tape wrapped underneath, ... whatever just so long as the bow and stern are straight.
12. Align the panels seams: In this step you will do whatever you need to do to make sure that the panel seams are aligned and even to each other. Use the thumb tacks included in the kit to pull a seam outward to better align with the panel next to it. Reach underneath to the inside of the hull and gently push out a panel that isn't lined up properly. Then take a tack and push it into the edge of the panel you just pushed out. When you release the panel the tack should hold the panel out so that the two panels evenly line up together. Sometimes if the seams are tight enough you can just manually push or pull the panels in or out to align them and they might remain where you put them.
Work your way through the entire hull making sure that every panel is aligned to the ones next to it and that parts are not pushed inside or outside of each other. Then should ALL meet at the edges evenly.
13. LAST CHANCE! Make sure that everything looks good. Make any adjustments you need. Once you do the next step it will be sealed for eternity (or until a heat gun is used).
14. Epoxy the seams: Mix up some epoxy and pour it into one of the syringes included in the kit. Wherever you can access the seams add some epoxy. You should be able to access most of the boat. Run epoxy down the entire keel seam and all the other panel seams. At the ends where the panels meet flush you can just paint some on and it should wick into the seams. If you do that make sure you wipe up any drip, sags and runs to avoid heavy sanding later.
It's OK to let the epoxy run under the tape. The tape will come right off later on as it is plastic and won't stick to the epoxy.
Let that cure several hours and then come back and do it again, this time with thickened epoxy. Add the thickened epoxy wherever feasible but you don't need it where the seams are flush at the bow and stern. The seams with the thickened epoxy look better than unthickened.
Let it cure for at least 24 hours (longer if it's cold)
15: Remove the tape: This is when you'll be SO GLAD you made tabs on the ends of each piece of tape. Carefully and gently pull the tape off. Pull at a sharp angle against the tape so that you don't pull up too much wood fiber. If you pull too hard you might bring up pieces of wood. Avoid that by being careful and going slowly.
16. Epoxy the remaining seams: Once the tape is removed you can then fill in the rest of the exposed seams with epoxy and then thickened epoxy.
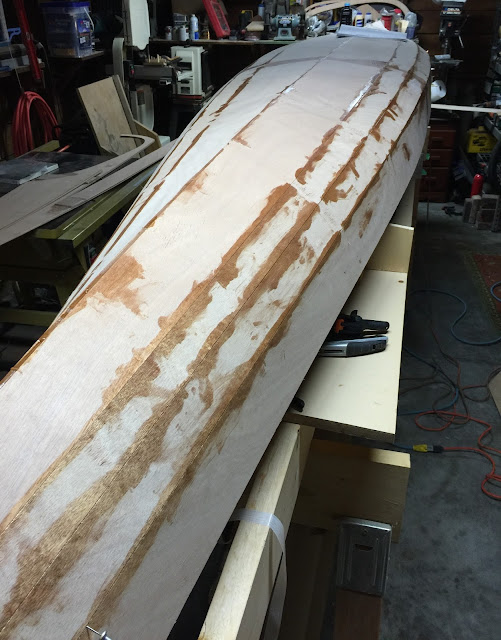
I did manage to take some snaps of the boat after the seams had been epoxied. There are still a few pieces of tape left in places that needed it until the epoxy dried so you can get a sense of what it was like when it had dozens of strips on it.

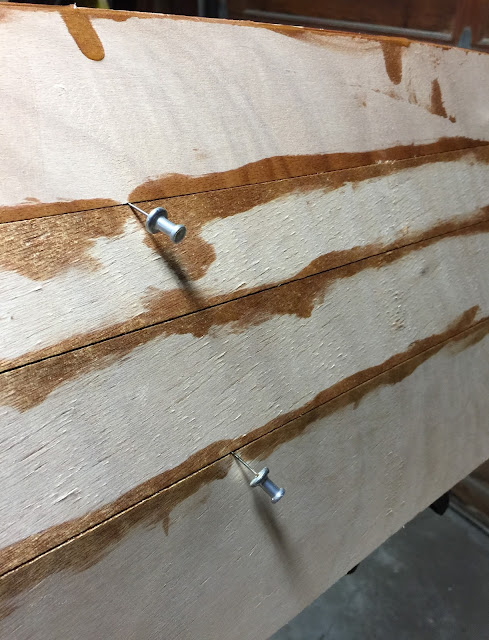
The pins are holding panels out so that they are even with the panel next to it. I know it looks like they aren't doing anything, but if you could see one removed you would see that one of the panels would snap inside of the one next to it. Leave the pins in place until the epoxy cures. They will come right out as they don't stick to the epoxy.
In the picture below you can see a clamp being used. Notice that it has some wedges (just small pieces of scrap Popsicle sticks) on the outside edges to help the clamp stay in place. You might also use bits of sandpaper to do the same thing.

Even though you are using a syringe, you will still have many drips and runs. Just paint them smooth with a foam brush or wipe them up with a paper towel if not too sticky. After it all cures you will give the seams a slight sanding to gently round over the seams a tiny amount. At the same time you can sand the flat parts of the panels to rough up the excess epoxy.
Don't worry about the epoxy being see later on... it all goes invisible when you do the main fiberglassing step soon.

TA DA! You did it! Look Ma, no holes!
Now follow the manual's steps for adding thickened epoxy to round off the bow and stern, and then for fiber-glassing the outside of the hull.
Aloha!
THIS ENTIRE POST IS AN ALTERNATIVE STEP FROM THE OFFICIAL PYGMY MANUAL: Once you have your temporary frames set up then it's time to start laying out the panels.
Other than being upside down, taping the hull isn't that much different at this point than wiring.
Have several rolls of strapping tape; the type with the monofilament running through it. I only used one full roll but will probably use at least another full roll when I tape the deck together later.
Cut several strips of tape. As you cut each strip, fold the both ends over oh itself by 1/4" or so. This creates a tab to make it MUCH easier to pull the tape off later. Really, do this to both ends of every single piece of tape that you use! You will thank me later.
Stick them onto your table for easy reach. The picture only shows four but have many more ready to go.

Note: I was completely forgetful and didn't get a single picture of my actual taped up hull! Ugh! Stooopid, stooooooopid... HOWEVER, you can see my post for taping the deck panels to get an idea of what the hull looked like. Oh well.
Here are the steps to tape your Pygmy kayak together:
1. Set the #1 panels on the frames: Start with just your two #1 panels. Lay them out on top of your temporary frames with the sticker side down. Make sure that the left panel is on the LEFT side of the hull keeping in mind that the hull is upside down.
HINT: When the hull is upside down, standing to the side of the temporary frames - If the bow is to your left, you're on the right side. This is the side you will put your "R" or right-side panels onto. If the bow is to your right, you're on the left side.
Also make sure the bow ends are pointed forward and the stern ends are pointed aft! You'll know if your #1 panels are laying correctly if the bow ends curve away from each other. Remember that as you start to twist the panels into a hull shape that the bow ends will start to come together and curve up (down actually while the hull is upside down).
Look underneath the panels to make sure that the lines you drew on the panels line up with the appropriate temporary frames. You're only lining up the three main temporary frames at this time. The smaller bow and stern end frames will be added later.
2. Align the #1 panels and tape them: (It's much easier if you have a helper during these steps) Now spend some time carefully aligning the two #1 panels so that the main seams line up perfectly. There should be a crisp line running across both panels. When lined up, place half of a strip of tape onto the epoxied portion of one of the panels but don't cover the main seam (you want to always see the seams to make sure that they line up properly). Just put it next to the seam on the epoxied bit. Now evenly and carefully lift the outside edges of both panels just an inch or so to bring the keel seam together a bit. Firmly stretch the tape across the keel seam and firmly press it down onto the other panel. If you have a helper then place a second piece of tape across the keel seam about 6-8" aft of the first piece. When you then let the outside edges back down the tape will firmly bind the keel seam together.
3. Tape the rest of the #1 panels out to the frames: Now work your way down the hull, alternating forward and aft, and tape the keel seam every foot or so. You might lift the outside edges again at least for the widest parts. Keep checking to make sure that the inside of the keel seam is sitting directly on top of the temporary frames at the highest points on the frames. Also make sure that the lines you drew on the panels line up with the frames.
Sight down the keel after every piece of tape to make sure the keel seam is straight.
NOTE: As you are taping, try not to have the tape hang over the outside edges of the panels. They just get in the way of the next panel.
4. Hot glue the panels to the frames: Once you have taped across the seams forward and aft far enough to get to the frames, you will then hot glue the panels to the frames. Take a hot glue gun, and while holding each panel down onto the frame, run a bead of glue about an 1" long on each side of the outside edge of the frame and the panel. This will hold the panels down and in place. Later on once the hull is turned over you can knock them out fairly easily.

5. Tape the ends: When you get toward the ends you will need to be creative with your taping. I just tape the keel seam as best I can for now knowing that I'll have to add more tape after I hot glue the bow and stern end frames.
As you work toward the bow and stern make sure that the panels don't slip and overlap each other. The panels should meet evenly at the edges. Yes, you can get them to do this. It's not that hard, but you'll need to keep your eye on the keel seam and check if it remains straight. If not use some of the long thumb tacks included in the kit to keep the keel straight. Just push them in one edge and lever it to straighten the two seams. You can also use the edge of a utility knife. Then add more tape across the seam to keep them aligned. NEVER tun tape ALONG the seams, always across so that you can have access to the seam later to put epoxy into the seam.
6. Hot glue the bow and stern END frames: Your kit includes two small pointy temporary frames. One should be marked bow and the other stern. You should also have already drawn lines on your panels for where these go. Line up the bow end frame underneath the bow and hold the outside edges down. If you have a helper you might be able to just hold the edges down while the other person runs a 1" bead of hot glue on both sides of the bow end frame for both panels. Hold it down until the glue cools which may be a few minutes. While you're doing this keep checking to see that the keel seam is still tightly butted together and that the end frame is pushed all the way up into the inside of the keel seam.
Repeat this step for the stern end frame.
7. Tape the bow and stern ends: You can try to bring the bow ends together with clamps but they usually slip off unless you make wedges. You can also try running tape underneath the panels to hold the outside edges down but that means that you'll have to cut some tape out later on. I run tape underneath (that is, down under the panels and all the way across the inside of the hull to the other side) wherever I need to. It can be a bit of a challenge getting them out later after you've epoxied the seams, but it's not that bad.
8. Double and triple check the keel seam: Now is a great time to make any adjustments needed. Are the main seams still lined up? Are the aft seams lined up? Is the keel seam straight? Spend some time on this step because once you start adding the next panels it becomes almost impossible to make changes. Small imperfections now will be magnified later on so be sure the keel is a straight as you can make it.
9. Tape on the #2 panels: Carefully place one of the #2 panels onto the hull in the proper orientation (see step 1 again). Line the main seams up perfectly with the #1 main seams. Once aligned then firmly stretch tape across the #2 panel onto the #1 panel. Again, it helps to lift the outside edges a bit to make the taping even tighter. Now put the other #2 panel on and tape it the same way.
Repeat the same basic processes (Steps 2-8 above) for both #2 panels. You will always do BOTH sides at the same time. Do NOT do all the panels on one side and then the panels on the other. This will make for a crooked hull. By doing both sides at the same time you can make a much straighter hull.
10. Tape on the #3 and #4 panels: Repeat for the #3 panels and then again for the #4 panels.
The hull should now have many, many strips of tape on it! That's OK as long as you can still see most of the seams so that you can add epoxy.
11. Straighten the keel seam at the bow and stern: Sight down the keel seam paying attention to the bow and stern. Are they straight? Do whatever you need to do to straighten the bow and stern seams so that the entire keel seam is as straight as possible. Use tape, clamps, pressure, tape wrapped underneath, ... whatever just so long as the bow and stern are straight.
12. Align the panels seams: In this step you will do whatever you need to do to make sure that the panel seams are aligned and even to each other. Use the thumb tacks included in the kit to pull a seam outward to better align with the panel next to it. Reach underneath to the inside of the hull and gently push out a panel that isn't lined up properly. Then take a tack and push it into the edge of the panel you just pushed out. When you release the panel the tack should hold the panel out so that the two panels evenly line up together. Sometimes if the seams are tight enough you can just manually push or pull the panels in or out to align them and they might remain where you put them.
Work your way through the entire hull making sure that every panel is aligned to the ones next to it and that parts are not pushed inside or outside of each other. Then should ALL meet at the edges evenly.
13. LAST CHANCE! Make sure that everything looks good. Make any adjustments you need. Once you do the next step it will be sealed for eternity (or until a heat gun is used).
14. Epoxy the seams: Mix up some epoxy and pour it into one of the syringes included in the kit. Wherever you can access the seams add some epoxy. You should be able to access most of the boat. Run epoxy down the entire keel seam and all the other panel seams. At the ends where the panels meet flush you can just paint some on and it should wick into the seams. If you do that make sure you wipe up any drip, sags and runs to avoid heavy sanding later.
It's OK to let the epoxy run under the tape. The tape will come right off later on as it is plastic and won't stick to the epoxy.
Let that cure several hours and then come back and do it again, this time with thickened epoxy. Add the thickened epoxy wherever feasible but you don't need it where the seams are flush at the bow and stern. The seams with the thickened epoxy look better than unthickened.
Let it cure for at least 24 hours (longer if it's cold)
15: Remove the tape: This is when you'll be SO GLAD you made tabs on the ends of each piece of tape. Carefully and gently pull the tape off. Pull at a sharp angle against the tape so that you don't pull up too much wood fiber. If you pull too hard you might bring up pieces of wood. Avoid that by being careful and going slowly.
16. Epoxy the remaining seams: Once the tape is removed you can then fill in the rest of the exposed seams with epoxy and then thickened epoxy.
I did manage to take some snaps of the boat after the seams had been epoxied. There are still a few pieces of tape left in places that needed it until the epoxy dried so you can get a sense of what it was like when it had dozens of strips on it.

The pins are holding panels out so that they are even with the panel next to it. I know it looks like they aren't doing anything, but if you could see one removed you would see that one of the panels would snap inside of the one next to it. Leave the pins in place until the epoxy cures. They will come right out as they don't stick to the epoxy.

In the picture below you can see a clamp being used. Notice that it has some wedges (just small pieces of scrap Popsicle sticks) on the outside edges to help the clamp stay in place. You might also use bits of sandpaper to do the same thing.

Even though you are using a syringe, you will still have many drips and runs. Just paint them smooth with a foam brush or wipe them up with a paper towel if not too sticky. After it all cures you will give the seams a slight sanding to gently round over the seams a tiny amount. At the same time you can sand the flat parts of the panels to rough up the excess epoxy.
Don't worry about the epoxy being see later on... it all goes invisible when you do the main fiberglassing step soon.


TA DA! You did it! Look Ma, no holes!
Now follow the manual's steps for adding thickened epoxy to round off the bow and stern, and then for fiber-glassing the outside of the hull.
Aloha!
Comments
Post a Comment