
ALTERNATIVE STEP FROM THE OFFICIAL PYGMY MANUAL:
I switched around a step... I added the keel tape before fiberglassing the entire hull. Did that a few days ago and scraped off the rough edge that forms. Then sanded down the edges and the wood where I brushed out the excess epoxy. Doing the keel tape first makes for a much cleaner looking hull when you're finished. If in the future you ever need to add fiberglass to the keel you simply rough up the keel with some sandpaper and epoxy down a new strip.
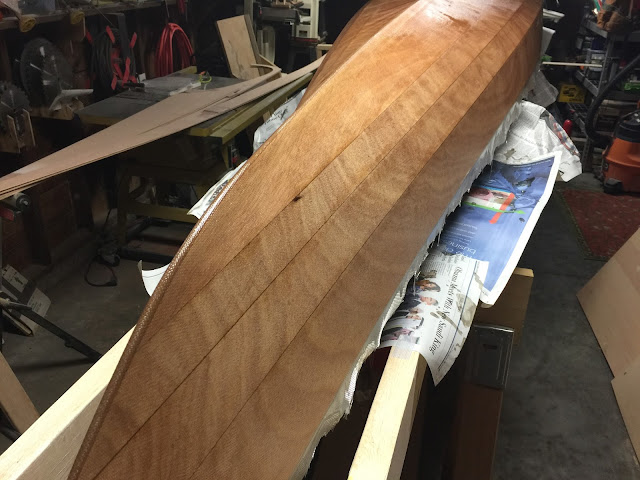
Did one of the more fun steps today... fiberglassed the outside of the hull! It's like magic how the fiberglass cloth turns clear as you add the epoxy. I can now get a good look at what the wood looks like.
Here are some pictures of the cloth draped over the hull: (Again, note that the keel tape has already been applied and is underneath the cloth already.)
As you smooth it down with your hands you'll see that it will conform to the shape of the bow. You'll need to make some cuts though for it to wrap around the stern.


And here is what it looks like a couple hours later with the epoxy rolled on and squeegeed out. I won't go into too much detail here as the Pygmy manual tells you exactly how to do these steps. I pour some epoxy over sections of the flat areas and then gently spread it around with a squeegee being careful not to push too hard so that I don't add too much air. Then I use a roller. (Cut the rollers Pygmy sells in half. Works much better than a whole one.) You roll on epoxy with a roller being careful to not move the cloth too much. The rollers are essential on the sides where you really can't spread with a squeegee. I do two sections like that and then come back and squeegee off the excess so that the cloth lays flat on the hull. If you don't squeegee then the cloth will float on top of the epoxy and you'll have huge waves that you'll never be able to sand flat. You must squeegee the excess and scrape each pass into a cup. Do NOT reuse this squeegeed epoxy and it is full of air and will make white streaks. Squeegee hard enough to push the cloth down and scrape off excess epoxy, but not hard enough that you'll starve the wood. If the cloth starts to look a little "white" or cloudy then you've squeegeed too hard and might need to roll some epoxy back on and try squeegeeing again.
In the picture below you can see two thing to pay attention to...
ALTERNATIVE STEPS FROM THE OFFICIAL PYGMY MANUAL:
First, the Hull ID number. Pygmy will send you a hull ID number that the Coast Guard requires to be permanently built into the hull. Some people use a wood burner but I like the cleaner look of a computer printed number. I simply printed it on laser printer transparency sheets, cut it out as close as possible to the number, and epoxied it to the hull. Make sure to place it within a foot of the stern and within 2" of the hull/deck joint.
Paint on some epoxy just in that little area, place the number down and push out any air bubbles, then paint on some epoxy over the top. You'll need to clean up some drips as it dries and you'll probably have to adjust the positioning too as it can slip down. Let cure.
When cured give it the lightest sanding possible. Just enough to rough up the outside epoxy. Plastic doesn't stick to epoxy so you don't want to sand through the epoxy that encapsulates the number.
You can also see in the picture below the cut ends of the cloth that wrapped around the stern.The other side looks completely clean as there is no open edge to the cloth (it's wrapped underneath) and all blends together invisibly. But on this side you can see the wrap from the other side. It's pretty obvious now but will go totally invisible as I sand this layer smooth and then roll on more epoxy later. The small bits that you can see sticking up on the curve of the stern will simply be cut out and sanded smooth. It will all look great when done.

The edges of the cloth will be cut in a few hours as the epoxy reaches the "green" stage. It then cuts very easily with a utility knife. If you wait until it cured it will still cut but not as easily or cleanly.

If you are careful and use the roller and squeegee to move the cloth around a bit, then you can make the cloth conform to the shape of the bow without any cutting of the cloth. Looks good!

More later!
Aloha!
I switched around a step... I added the keel tape before fiberglassing the entire hull. Did that a few days ago and scraped off the rough edge that forms. Then sanded down the edges and the wood where I brushed out the excess epoxy. Doing the keel tape first makes for a much cleaner looking hull when you're finished. If in the future you ever need to add fiberglass to the keel you simply rough up the keel with some sandpaper and epoxy down a new strip.
Did one of the more fun steps today... fiberglassed the outside of the hull! It's like magic how the fiberglass cloth turns clear as you add the epoxy. I can now get a good look at what the wood looks like.
Here are some pictures of the cloth draped over the hull: (Again, note that the keel tape has already been applied and is underneath the cloth already.)
As you smooth it down with your hands you'll see that it will conform to the shape of the bow. You'll need to make some cuts though for it to wrap around the stern.


And here is what it looks like a couple hours later with the epoxy rolled on and squeegeed out. I won't go into too much detail here as the Pygmy manual tells you exactly how to do these steps. I pour some epoxy over sections of the flat areas and then gently spread it around with a squeegee being careful not to push too hard so that I don't add too much air. Then I use a roller. (Cut the rollers Pygmy sells in half. Works much better than a whole one.) You roll on epoxy with a roller being careful to not move the cloth too much. The rollers are essential on the sides where you really can't spread with a squeegee. I do two sections like that and then come back and squeegee off the excess so that the cloth lays flat on the hull. If you don't squeegee then the cloth will float on top of the epoxy and you'll have huge waves that you'll never be able to sand flat. You must squeegee the excess and scrape each pass into a cup. Do NOT reuse this squeegeed epoxy and it is full of air and will make white streaks. Squeegee hard enough to push the cloth down and scrape off excess epoxy, but not hard enough that you'll starve the wood. If the cloth starts to look a little "white" or cloudy then you've squeegeed too hard and might need to roll some epoxy back on and try squeegeeing again.
In the picture below you can see two thing to pay attention to...
ALTERNATIVE STEPS FROM THE OFFICIAL PYGMY MANUAL:
First, the Hull ID number. Pygmy will send you a hull ID number that the Coast Guard requires to be permanently built into the hull. Some people use a wood burner but I like the cleaner look of a computer printed number. I simply printed it on laser printer transparency sheets, cut it out as close as possible to the number, and epoxied it to the hull. Make sure to place it within a foot of the stern and within 2" of the hull/deck joint.
Paint on some epoxy just in that little area, place the number down and push out any air bubbles, then paint on some epoxy over the top. You'll need to clean up some drips as it dries and you'll probably have to adjust the positioning too as it can slip down. Let cure.
When cured give it the lightest sanding possible. Just enough to rough up the outside epoxy. Plastic doesn't stick to epoxy so you don't want to sand through the epoxy that encapsulates the number.
You can also see in the picture below the cut ends of the cloth that wrapped around the stern.The other side looks completely clean as there is no open edge to the cloth (it's wrapped underneath) and all blends together invisibly. But on this side you can see the wrap from the other side. It's pretty obvious now but will go totally invisible as I sand this layer smooth and then roll on more epoxy later. The small bits that you can see sticking up on the curve of the stern will simply be cut out and sanded smooth. It will all look great when done.

The edges of the cloth will be cut in a few hours as the epoxy reaches the "green" stage. It then cuts very easily with a utility knife. If you wait until it cured it will still cut but not as easily or cleanly.

If you are careful and use the roller and squeegee to move the cloth around a bit, then you can make the cloth conform to the shape of the bow without any cutting of the cloth. Looks good!


More later!
Aloha!
Comments
Post a Comment