
My biggest deviation from the official Pygmy Manual is coming up next. I tape the panels together instead of "stitching" them with wire. It's a bit tricky, but so is stitching. In the end it's probably easier and you end up with a boat without hundreds of tiny holes all over it. The boat looks so much cleaner!
Many builders over the years have used the taping method instead of stitch and glue. It's a tried and true method that really works well. Pygmy even does a variation of it during their build classes. However, the official manual still has you do the stitch and glue method, and as of yet there isn't really a manual on how to do the taping method. My thought is that I would do this blog and then copy the posts into the new Rogue Manual that I'm tinkering on.
THE REST OF THIS ENTIRE POST IS AN ALTERNATIVE STEP FROM THE OFFICIAL PYGMY MANUAL: So here is my approach to how to tape a Pygmy kayak:
Part I: Preparing the temporary frames
j.
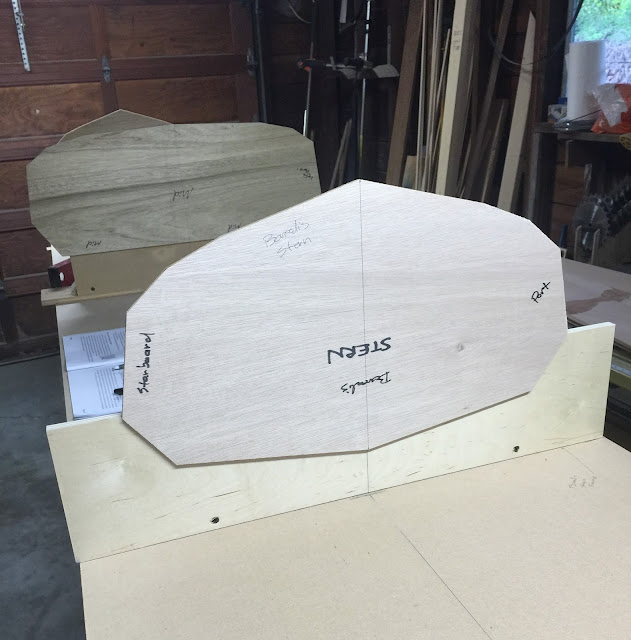
NOTE: Remember that you are mounting these frames upside down. What
will be the keel (bottom end) will be UP, and the deck side will be down!
Use a straight edge and pencil to draw a [horizontal] line across each main frame sheer chine to sheer chine. With the frame flat on the table, align the appropriate spacer to this line and tack it down to the frame using a few drops of hot glue. Hold the frame so that the frame top and spacer sit over the edge of the table and secure the spacer with three 1” screws.
Next, stand the frame up with the spacer resting on a flat clean section of table. Align and screw a 2x4 to the spacer to hold the fame upright. After all three frame assemblies are ready, space them out on the table approximate to where they will be in the boat. Watch this video on attaching frame spacers.
UPDATE: THE PICTURES BELOW SHOW A BASE SUPPORT BOARD THAT GOES ALL THE WAY ACROSS EACH FRAME. THIS DOES NOT WORK FOR EVERY FRAME! Instead, you should use a base that is NOT as wide as the frame. The outside planks will need to hang a small bit below where the base piece goes. So... ignore my wide base pieces, they were all replaced with narrower ones for the actual build.


Many builders over the years have used the taping method instead of stitch and glue. It's a tried and true method that really works well. Pygmy even does a variation of it during their build classes. However, the official manual still has you do the stitch and glue method, and as of yet there isn't really a manual on how to do the taping method. My thought is that I would do this blog and then copy the posts into the new Rogue Manual that I'm tinkering on.
------------------------------------------------------------
THE REST OF THIS ENTIRE POST IS AN ALTERNATIVE STEP FROM THE OFFICIAL PYGMY MANUAL: So here is my approach to how to tape a Pygmy kayak:
Part I: Preparing the temporary frames
1.
Now we’re going to put the manual aside for a
bit and do some additional work with the temporary frames. This step is also
why your table needs to be as flat as possible.
a.
Clear off your entire table.
b.
Scrap or sand off any raised epoxy drips.
c.
Do what you can to make the table as flat as
possible, especially in the middle 8’ or more.
d.
Snap a chalk line from one end to the other end exactly
down the middle of the table.
e.
Mark one end of the table “BOW” and the other
end “STERN”.
f.
(For LONG boats 17’ or more: Coho, Artic Tern,
Borealis, etc…): Working from the BOW of the table measure back about 7’ and
make a pencil line perpendicular to the long chalk line. Mark this line “Butt
Seam”. The main seam on the Coho, Artic Tern, Borealis, and other “three piece”
panel boats is not half-way down the boat. Rather it’s forward of the cockpit
about 7’ or more from the bow. Marking your butt seam line about 7’ back
(depending on your model) will usually allow the bow and stern to roughly equally
overhang the ends of your 16’ table. For
shorter boats (less than 16’) it doesn’t matter as much and you may want to
adjust this line, or simply use the seam on the table.
g.
Now, using that “Butt Seam” line as your
starting point, you will add the same lines that you did on panel #1. This
assumes that the main butt seam in the panels will be lined up with the “Butt
Seam” line you just marked on your table. Use the “Measure and Mark…” step in
the Pygmy Manual to accurately and squarely mark lines across your table for
the temporary frames. MAKE SURE THESE PANEL LINES CORRESPOND TO THE PROPER
DIRECTION AS THE BOW AND STERN ENDS ON THE TABLE!
h.
Make the temporary frame spacers: The temporary
frames need to be held in perfect alignment to each other above the work table.
To do so you will add a “spacer” onto each frame that will hold that frame a
specific height above the table. You will mount the spacer in an exact position
to the each temporary frame, and then mount the frame/space assembly to a piece
of 2x4 which will be screwed to the table. In this way the temporary frames
will be held in perfect position above the table for you to build your hull on
top of.
The following is [mostly] from the “Pygmy Class Instructors Manual”: Each boat will need a set of three ¼” thick plywood spacers which are attached to the three main frames at exact locations. (Note: The Selkie kit includes the correct size spacers.) Rip the spacers on a table saw being as accurate as you can. The spacer heights are critical to the shape of the boat. Cut the spacers to length with a chop saw. Pygmy suggests that each spacer length should be about 1" less than the overall width of its corresponding frame, but I have found that if the spacers are wider than the frame that panel #4 will have something to rest on top of (NOTE: doing this though will make it difficult to fiberglass the boat later!! Stick to the Pygmy suggestion and make it less wide than the frame). At the same time cut a length of 2x4 which roughly matches each of these spacer widths.
The spacer measurements for all boat models are as follows:
Model
|
Bow
|
Mid
|
Stern
|
Tern-14
|
6
13/16"
|
8
|
7
3/16"
|
Tern-17
|
5
9/16"
|
7
1/16"
|
6
3/16"
|
Murrelet
(all designs)
|
7
1/8"
|
8
1/2"
|
7
11/16"
|
Coho
|
5
11/16"
|
7
11/16"
|
6
3/4"
|
Osprey
Std
|
4
1/16"
|
6"
|
5
1/16"
|
Borealis
XL*
|
5
15/16” *
|
6
½” * (This middle spacer height is incorrect and Pygmy is working on a solution. I ended up using 7 1/8" and it worked OK. I would use 7 1/4+" next time though!)
|
5
11/16” *
|
Pinguino
Sport
|
5
7/16”
|
7
7/8”
|
6
11/16”
|
Pinguino
145 & 145-4PD
|
7
¼”
|
9”
|
7
15/16”
|
*NOTE: There is some confusion on the exact measurements for the
Borealis spacers. We will update this when John (the Pygmy founder and
designer) looks at it. This
middle spacer height is incorrect and Pygmy is working on a solution. I
ended up using 7 1/8" and it worked OK. I would use 7 1/4+" next time
though!
i.
Mount the temporary frames to the table. Gather
your three temporary frames and if they aren’t already clearly marked, then
mark them appropriately “Bow”, “Middle”, and “Stern”.
Using a good straight edge, draw a vertical line from the bottom to the top. You will use this line later.
Using a good straight edge, draw a vertical line from the bottom to the top. You will use this line later.
Use a straight edge and pencil to draw a [horizontal] line across each main frame sheer chine to sheer chine. With the frame flat on the table, align the appropriate spacer to this line and tack it down to the frame using a few drops of hot glue. Hold the frame so that the frame top and spacer sit over the edge of the table and secure the spacer with three 1” screws.
Next, stand the frame up with the spacer resting on a flat clean section of table. Align and screw a 2x4 to the spacer to hold the fame upright. After all three frame assemblies are ready, space them out on the table approximate to where they will be in the boat. Watch this video on attaching frame spacers.
UPDATE: THE PICTURES BELOW SHOW A BASE SUPPORT BOARD THAT GOES ALL THE WAY ACROSS EACH FRAME. THIS DOES NOT WORK FOR EVERY FRAME! Instead, you should use a base that is NOT as wide as the frame. The outside planks will need to hang a small bit below where the base piece goes. So... ignore my wide base pieces, they were all replaced with narrower ones for the actual build.


k.
Using a straightedge and the lines on your
table, very carefully and accurately align the temporary frame assembly to the
table. Make sure that the temporary frames are square to the table and that
they are directly above the lines.
These frames determine the shape of your hull so good accuracy is required.
Stand at the ends of the table and sight down the table across the tops of the frames. Do the tops (actually the bottoms… remember that you are building the boat upside down) line up horizontally (left and right)? They may not line up in a straight line vertically to each other depending on your model.
Comments
Post a Comment